Train Your Own OpenCV Haar Classifier
Open this page, allow it to access your webcam and see your face getting recognized by your browser using JavaScript and OpenCV, an “open source computer vision library”. That’s pretty cool! But recognizing faces in images is not something terribly new and exciting. Wouldn’t it be great if we could tell OpenCV to recognize something of our choice, something that is not a face? Let’s say… a banana?
That is totally possible! What we need in order to do that is called a “cascade classifier for Haar features” to point OpenCV at. A cascade classifier basically tells OpenCV what to look for in images. In the example above a classifier for face features was being used. There are a lot of cascade classifiers floating around on the internet and you can easily find a different one and use it. But most of them are for recognizing faces, eyes, ears and mouths though and it would be great if we could tell OpenCV to recognize an object of our choice. We need a cascade classifier that tells OpenCV how to recognize a banana.
Here’s the good news: we can generate our own cascade classifier for Haar features. Over in computer vision land that’s called “training a cascade classifier”. Even better news: it’s not really difficult. And by “not really” I mean it takes time and a certain amount of willingness to dig through the internet to find the relevant information and tutorials on how to do it, but you don’t need a PhD and a lab.
But now for the best of news: keep on reading! We’ll train our own cascade classifier in the following paragraphs and you just need to follow the steps described here.
The following instructions are heavily based on Naotoshi Seo’s immensely helpful notes on OpenCV haartraining and make use of his scripts and resources he released under the MIT licencse. This is an attempt to provide a more up-to-date step-by-step guide for OpenCV 2.x that wouldn’t be possible without his work — Thanks Naotoshi!
Let’s get started
The first thing you need to do is clone the repository on GitHub I made for this post. It includes some empty directories (which we’ll fill later on), some utilities and most importantly: an even playing field.
git clone https://github.com/mrnugget/opencv-haar-classifier-training
You’ll also need OpenCV on your system. The preferred installation methods
differ between operating systems so I won’t go into them, but be sure to get at
least OpenCV 2.4.5, since that’s the version this post is based on and OpenCV
2.x had some major API changes. Build OpenCV with TBB enabled,
since that allows us to make use of multiple threads while training the
classifier.
If you’re on OS X and use homebrew it’s as easy as this:
brew tap homebrew/science
brew install --with-tbb opencv
Another thing we need is the OpenCV source code corresponding to our installed version. So if your preferred installation method doesn’t provide you with access to it go and download it. If you get a compiler error further down, be sure to try it with OpenCV 2.4.5.
Samples
In order to train our own classifier we need samples, which means we need a lot of images that show the object we want to detect (positive sample) and even more images without the object (negative sample).
How many images do we need? The numbers depend on a variety of factors, including the quality of the images, the object you want to recognize, the method to generate the samples, the CPU power you have and probably some magic.
Training a highly accurate classifier takes a lot of time and a huge number of samples. The classifiers made for face recognition are great examples: they were created by researchers with thousands of good images. The TechnoLabsz blog has a great post that provides some information based on their experience:
It is unclear exactly how many of each kind of image are needed. For Urban
Challenge 2008 we used 1000 positive and 1000 negative images whereas the
previous project Grippered Bandit used 5000. The result for the Grippered Bandit
project was that their classifier was much more accurate than ours.
This post here is just an introduction and getting a large number of good samples is harder than you might think, so we’ll just settle on the right amount that gives us decent results and is not too hard to come by:
I’ve had success with the following numbers for small experiments: 40 positive samples and 600 negative samples. So let’s use those!
Positive Images
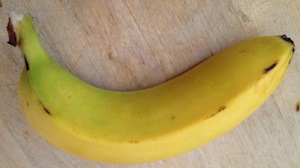
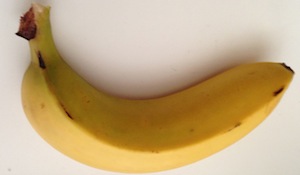
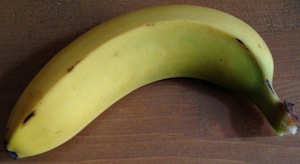
Now we need to either take photos of the object we want to detect, look for them on the internet, extract them from a video or take some Polaroid pictures and then scan them: whatever it takes! We need 40 of them, which we can then use to generate positive samples OpenCV can work with. It’s also important that they should differ in lighting and background.
Once we have the pictures, we need to crop them so that only our desired object is visible. Keep an eye on the ratios of the cropped images, they shouldn’t differ that much. The best results come from positive images that look exactly like the ones you’d want to detect the object in, except that they are cropped so only the object is visible.
Again: a lot of this depends on a variety of factors and I don’t know all of them and a big part of it is probably black computer science magic, but since I’ve had pretty good results by cropping them and keeping the ratio nearly the same, let’s do the same now. To give you an idea, here are some scaled down positive images for the banana classifier:
Take the positive, cropped images and put them in the ./positive_images
directory of the cloned repository.
Then, from the root of the repository, run this command in your shell:
find ./positive_images -iname "*.jpg" > positives.txt
Negative Images
Now we need the negative images, the ones that don’t show a banana. In the best case, if we were to train a highly accurate classifier, we would have a lot of negative images that look exactly like the positive ones, except that they don’t contain the object we want to recognize. If you want to detect stop signs on walls, the negative images would ideally be a lot of pictures of walls. Maybe even with other signs.
We need at least 600 of them. And yes, getting them manually by hand takes a long time. I know, I’ve been there. But again: you could take a video file and extract the frames as images. That way you’d get 600 pictures pretty fast.
For the banana classifier I used random photos from my iPhoto library and some photos of the background where I photographed the banana earlier, since the classifier should be able to tell OpenCV about a banana in pretty much any picture.
Once we have the images, we put all of them in the negative_images folder of
the repository and use find to save the list of relative paths to a
file:
find ./negative_images -iname "*.jpg" > negatives.txt
Creating Samples
With our positive and negative images in place, we are ready to generate samples out of them, which we will use for the training itself. We need positive and negative samples. Luckily we already have the negative samples in place. To quote the OpenCV documentation about negative samples:
"Negative samples are taken from arbitrary images. These images must not contain
detected objects. Negative samples are enumerated in a special file. It is a
text file in which each line contains an image filename (relative to the
directory of the description file) of negative sample image."
That means our negatives.txt will serve as a list of negative samples. But we
still need positive samples and there are a lot of different ways to get them
which all lead to different results regarding the accuracy of your trained
classifier. Be sure to read the reference about creating samples in Naotoshi
Seo’s tutorial, to know what it’s all
about.
We’re going to use a method that doesn’t need a lot of preparation or a large
number of positive or negative images. We’ll use a tool OpenCV gives us:
opencv_createsamples. This tool offers several options as to how generate
samples out of input images and gives us a *.vec file which we can then use
to train our classifier.
opencv_createsamples generates a large number of positive samples from our
positive images, by applying transformations and distortions. Since
one can only transform so much out of one image until it’s not a different
version anymore, we need a little help to get a larger number of samples out of
our relatively small number of input images.
Naotoshi Seo wrote some really useful scripts that help a lot when generating
samples. The first one we’ll use is createsamples.pl, a small Perl script, to
get 1500 positive samples, by combining each positive image with a random negative
image and then running them through opencv_createsamples.
So, let’s make sure we’re in the root directory of the repository and fire this up:
perl bin/createsamples.pl positives.txt negatives.txt samples 1500\
  "opencv_createsamples -bgcolor 0 -bgthresh 0 -maxxangle 1.1\
  -maxyangle 1.1 maxzangle 0.5 -maxidev 40 -w 80 -h 40"
This shouldn’t take too long. There is a lot of information about
opencv_createsamples available online, be sure to read up on
it,
if you want to tune the parameters. What you need to pay attention to are -w
and -h: they should have the same ratio as your positive input images.
The next thing we need to do is to merge the *.vec files we now have in the
samples directory. In order to do so, we need to get a list of them and then
use Naotoshi Seo’s mergevec.cpp tool, which I’ve included in the src
directory of the repository, to combine them into one *.vec file.
In order to use it, we need to copy it into the OpenCV source directory and compile it there with other OpenCV files:
cp src/mergevec.cpp ~/opencv-2.4.5/apps/haartraining
cd ~/opencv-2.4.5/apps/haartraining
g++ `pkg-config --libs --cflags opencv` -I. -o mergevec mergevec.cpp\
  cvboost.cpp cvcommon.cpp cvsamples.cpp cvhaarclassifier.cpp\
  cvhaartraining.cpp\
  -lopencv_core -lopencv_calib3d -lopencv_imgproc -lopencv_highgui -lopencv_objdetect
Then we can go back to the repository, bring the executable mergevec with us and use it:
find ./samples -name '*.vec' > samples.txt
./mergevec samples.txt samples.vec
We can now use the resulting samples.vec to start the training of our
classifier.
Training the classifier
OpenCV offers two different applications for training a Haar classifier:
opencv_haartraining and opencv_traincascade. We are going to use
opencv_traincascade since it allows the training process to be multi-threaded,
reducing the time it takes to finish, and is compatible with the newer OpenCV
2.x API. Whenever you run into a problem when loading your classifier, make sure
the application knows how to handle the format of the cascade file, since
cascade files generated by opencv_haartraining and opencv_traincascade
differ in format.
Many tools and libraries out there (including jsfeat, which is used in the
example in the first paragraph) only accept classifiers in the old format. The
reason for this is most likely that the majority of the easily available
classifiers (e.g. the ones that ship with OpenCV) still use that format. So if
you want to use these libraries and tools you should use opencv_haartraining
to train your classifier.
So let’s point opencv_traincascade at our positive samples (samples.vec),
negative images, tell it to write its output into the classifier directory of
our repository and the sample size (-w and -h). -numNeg specifies how many
negative samples are there and -precalcValBufSize and -precalcIdxBufSize how
much memory to use while training. -numPos should be lower than the positive
samples we generated.
opencv_traincascade -data classifier -vec samples.vec -bg negatives.txt\
  -numStages 20 -minHitRate 0.999 -maxFalseAlarmRate 0.5 -numPos 1000\
  -numNeg 600 -w 80 -h 40 -mode ALL -precalcValBufSize 1024\
  -precalcIdxBufSize 1024
Read at least this post on the OpenCV answer board
and the official documentation
about opencv_traincascade to get a better understanding of the parameters in
use here. Especially the -numPos parameter can cause some
problems.
This is going to take a lot of time. And I don’t mean the old “get a coffee and come back”-taking-a-lot-of-time, no. Running this took a couple of days on my mid-2011 MacBook Air. It will also use a lot of memory and CPU. Do something else while this runs and come back after you noticed that it finished. Even better: use a EC2 box to run this on.
You don’t have to keep the process running without any interruptions though: you can stop and restart it at any time and it will proceeded from the latest training stage it finished.
Output during OpenCV training
Thank you Kevin Hughes for providing this chapter.
After starting the training program it will print back its parameters and then start training. Each stage will print out some analysis as it is trained:
===== TRAINING 0-stage =====
<BEGIN
POS count : consumed   1000 : 1000
NEG count : acceptanceRatio    600 : 1
Precalculation time: 11
+----+---------+---------+
|  N |    HR   |    FA   |
+----+---------+---------+
|   1|        1|        1|
+----+---------+---------+
|   2|        1|        1|
+----+---------+---------+
|   3|        1|        1|
+----+---------+---------+
|   4|        1|        1|
+----+---------+---------+
|   5|        1|        1|
+----+---------+---------+
|   6|        1|        1|
+----+---------+---------+
|   7|        1| 0.711667|
+----+---------+---------+
|   8|        1|     0.54|
+----+---------+---------+
|   9|        1|    0.305|
+----+---------+---------+
END>
Training until now has taken 0 days 3 hours 19 minutes 16 seconds.
Each row represents a feature that is being trained and contains some output about its HitRatio and FalseAlarm ratio. If a training stage only selects a few features (e.g. N = 2) then its possible something is wrong with your training data.
At the end of each stage the classifier is saved to a file and the process can be stopped and restarted. This is useful if you are tweaking a machine/settings to optimize training speed.
When the process is finished we’ll find a file called classifier.xml in the
classifier directory. This is the one, this is our classifier we can now use
to detect bananas with OpenCV! Only the sky is the limit now.
Using our own classifier
Node.js and OpenCV
Let’s give our classifier a shot by using Node.js and the node-opencv module. We’ll use one of the examples in the repository and modify it to scan multiple image files.
var cv = require('opencv');

var color       = [0, 255, 0];
var thickness   = 2;
var cascadeFile = './my_cascade.xml';

var inputFiles = [
  './recognize_this_1.jpg', './recognize_this_2.jpg', './recognize_this_3.jpg',
  './recognize_this_3.jpg', './recognize_this_4.jpg', './recognize_this_5.jpg'
];

inputFiles.forEach(function(fileName) {
  cv.readImage(fileName, function(err, im) {
    im.detectObject(cascadeFile, {neighbors: 2, scale: 2}, function(err, objects) {
      console.log(objects);
      for(var k = 0; k < objects.length; k++) {
        var object = objects[k];
        im.rectangle(
          [object.x, object.y],
          [object.x + object.width, object.y + object.height],
          color,
          2
        );
      }
      im.save(fileName.replace(/\.jpg/, 'processed.jpg'));
    });
  });
});
This code is pretty straightforward: change inputFiles so that it contains
the paths to the files that include the object we want to detect and mark, then
run it with node recognize_this.js. It will read in the specified inputFiles
with OpenCV and try to detect objects with our cascade classifier.
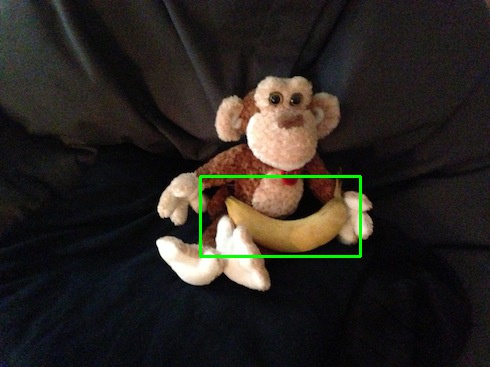
Now open all the files ending in *processed.jpg and see if your classifier works:
if OpenCV detected one or more objects in one of the input files it should have
marked them with a green rectangle. If the results are not to your liking, try
playing around with the neighbors and scale options passed to
detectObject.
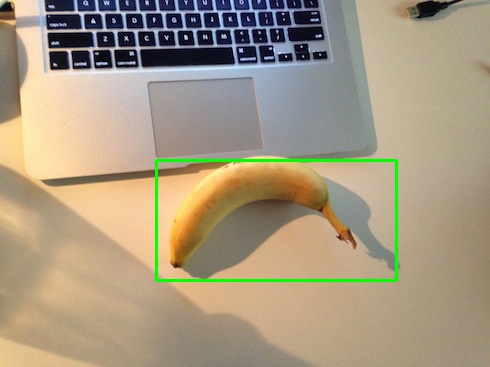
The banana classifier works quite well:
OpenCV’s facedetect
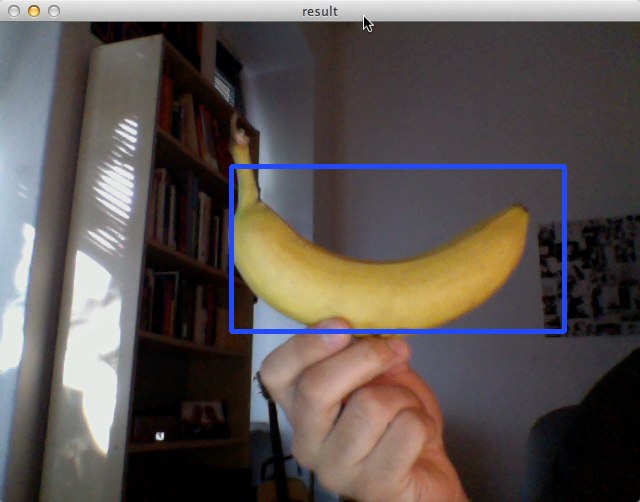
Now let’s use our webcam to detect a banana! OpenCV ships with a lot of samples
and one of them is facedetect.cpp, which allows us to detect objects in video
frames captured by a webcam. Compiling and using it is pretty straightforward:
cd ~/opencv-2.4.5/samples/c
chmod +x build_all.sh
./build_all.sh
./facedetect --scale=2 --cascade="/Users/mrnugget/banana_classifier.xml"
Be sure to play around with the --scale parameter, especially if the results
are not what you expected. If all goes well, you should see something like this:
In Closing
OpenCV, Haar classifiers and image detection are vast topics that are nearly impossible to cover in a blog post of this size, but I hope this post helps you to get your feet wet and gives you an idea of what’s possible. If you want to get a more thorough understanding start reading through the references linked below.
Be sure to dig through the samples folder of the OpenCV source, play around
with other language bindings and libraries. With your own classifier it’s even
more fun than “just” detecting faces. And if your classifier is not yet
finished, try playing around with the banana classifier I put in the
trained_classifier
directory of the repository. I’m sure there are thousands of super practical use
cases for it, so go ahead and use it. And if you want to add your classifier to
the directory just send a pull request!
If there are any questions, problems or remarks: leave a comment!
References:
- OpenCV Documentation - Haar Feature-based Cascade Classifier for Object Detection
- OpenCV Documentation - Cascade Classifier Training
- Naotoshi Seo - Tutorial: OpenCV haartraining (Rapid Object Detection With A Cascade of Boosted Classifiers Based on Haar-like Features)
- Material for Naotoshi Seo’s tutorial
- OpenCV Answers - “about traincascade paremeters, samples, and other…”
- OpenCV Answers - “memory consumption while training > 50GB”
- David J Barnes on Robotics & Mechatronics - OpenCV HaarTraining - Object Detection with a Cascade of Boosted Classifiers Based on Haar-like Features - Part I
- David J Barnes on Robotics & Mechatronics - OpenCV HaarTraining - Object Detection with a Cascade of Boosted Classifiers Based on Haar-like Features - Part II
- github.com/foo123/HAAR.js
- github.com/mtschirs/js-objectdetect
- github.com/inspirit/jsfeat
- Computer Vision Software - FAQ: OpenCV Haartraining
- StackOverflow - haar training OpenCV assertion failed


